MPV
For an overview, see:
- H. Baba et al., IEEE Trans. Nucl. Sci. 68, 1841 (2021).
- https://openit.kek.jp/workshop/2020/dsys/presentation/mpv20201130_baba.pdf
I/O
The I/O assignment depends on the firmware, but the commonly used MPV I/O is shown below.

MOCO
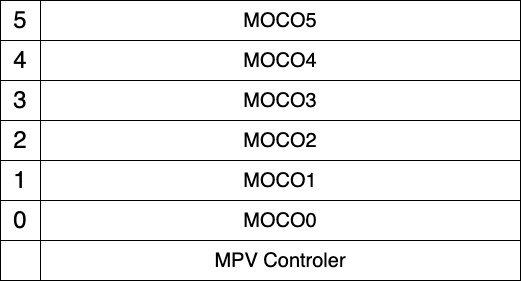
One MPV controller can read up to six MOCO boards. MOCO IDs are assigned from bottom to top as 0, 1, ..., 5.
VME modules connected to MOCO must have their base address set to 0x0000.
MPVCTRL
After logging in to mpv, modules connected to MOCO can be controlled with the mpvctrl command.
ssh root@mpv
Running mpvctrl without arguments displays the help message.
root@mpv22:~# mpvctrl
 mpvctrl COM [params] ...

 COM =  status   : Read status
        enable   : Enable MOCO (moco0--moco5, ts, none)
        busy     : Enable busy member (moco0--moco5, none)
        trigger  : Set Trigger (in0-in1, clk1k, clk10k, none)
        nout0    : NIM Out 0 (eob, busy, ungated, gated, pulse, level, clk10k, debug0--3, clk100m, mbusy0--5, int25m, ext25m)
        nout1    : NIM Out 1 (eob, busy, ungated, gated, pulse, level, clk10k, debug0--3, clk100m, mbusy0--5, int25m, ext25m)
        nout2    : NIM Out 2 (eob, busy, ungated, gated, pulse, level, clk10k, debug0--3, clk100m, mbusy0--5, int25m, ext25m)
        nout3    : NIM Out 3 (eob, busy, ungated, gated, pulse, level, clk10k, debug0--3, clk100m, mbusy0--5, int25m, ext25m)
        level    : Level output (0x0X)
        pulse    : Pulse output (0x0X)
        start    : Start Run (default is common trigger, [notrg] = w/o trigger)
        stop     : Stop Run
        reset    : Reset Run (when Start Run, reset is automatically issued)
        softtrg  : Software trigger (moco0--moco5)
        com      : Issue command frame (moco0--moco5)
        frame    : set command frame for moco by raw values (moco0--moco5, 0xXXXXXXXX x 3)
        latest   : see latest data from moco (moco0--moco5)
        vread    : VME read (moco0--moco5, D16/D32 AM Addr)
        vwrite   : VME write (moco0--moco5, D16/D32 AM Addr Value)
        vcont    : set VME DAQ continuous readout mode (moco0--moco5, IRQ/TRG/DUMMY CNT D16/D32 AM Addr)
        rread    : RAW read (moco0--moco5, 0xXXXXXXXX 0xXXXXXXXX 0xXXXXXXXX)
        rwrite   : RAW write (moco0--moco5, 0xXXXXXXXX 0xXXXXXXXX 0xXXXXXXXX)
        mocorst  : reset moco (moco0--moco5)
        mocotimer : set timerwait for moco (moco0--moco5 TIME (20ns step, < 65535, 0=disable))
        mocovc   : Enable/disable variable count read (to disable, AM=NONE) (moco0--moco5, D16/D32 AM Addr Mask)
        mocoiack : Enable/disable Iack response (moco0--moco5, enable/disable)
        mocopr0  : Set Pre0 command (to disable, AM=NONE) (moco0--moco5, R/W D16/D32 AM Addr [Value])
        mocopr1  : Set Pre1 command (to disable, AM=NONE) (moco0--moco5, R/W D16/D32 AM Addr [Value])
        mocops0  : Set Post0 command (to disable, AM=NONE) (moco0--moco5, R/W D16/D32 AM Addr [Value])
        mocops1  : Set Post1 command (to disable, AM=NONE) (moco0--moco5, R/W D16/D32 AM Addr [Value])
        v1x90    : for V1190/V1290 OPCODE (moco0--moco5, QN/QR/QW OPCode [nR]/[Val] [Val] ...)
        scaler   : see scaler values
        currentts : check current TS value (upper 32bit)
        babiscr  : send scaler values to babildes
        test     : Send test command to available MOCOs
        user     : Send user command to all MOCOs
        busystat : see Busy status
        debug    : for debug puporse (value)
        help     : Help


  for command frame
     RST       : Reset MOCO
     IRQ       : IRQ driven mode
     TRG       : Trigger driven mode
     DUMMY     : Dummy command
     D16/D32   : D16/D32 mode
     R/W       : Read or Write
     CNT       : Maximum number of readout data
     AM        : AM code (A16, A24, A24BLT, A32, A32BLT, A24INC <= address increment mode, NONE)
     Addr      : VME Address (only lower 24bit)
     Value     : Value to be written (only for Write mode)
Examples:
mpvctrl vread moco<N> D32 A24 0x0018
mpvctrl vwrite moco<N> D32 A24 0x0000 0xffffffff
MAC Address
Using devtool/findbiid
Connect the MPV to the LAN, then run babirl/devtool/findbiid on a machine connected to the same LAN.
./findbiid
------------------
BIID = bbdaqsrv
IP   = 0.0.0.0
MAC  = 00:00:00:00:00:00
Host = onokoro22.gen
------------------

------------------
BIID = bbdaqsrv
IP   = 0.0.0.0
MAC  = 00:00:00:00:00:00
Host = onokoro00.gen
------------------

------------------
BIID = bbdaqsrv
IP   = 172.27.220.180
MAC  = 84:47:09:14:48:25
Host = onokoro03.gen
------------------
Logging in via the serial port
screen /dev/tty.usbserial-AB0M7NK1 115200
mpv22 login: root
Password:
If baud rate = 115200 is not specified, the connection does not work properly.
After logging in, check the MAC address with ifconfig.
root@mpv22:~# ifconfig
Writing Firmware to MOCO
Firmware can also be written to MOCO from the MPV controller.
Place the firmware mocotrion.hex in /media/sd-mmcblk1p2 on the MPV controller.
First, check whether the flash memory on the MOCO is recognized correctly.
mpvspi -m MOCO -i <moco id (0-5)>
MODULE = MOCO
 MOCO 0
res : 0 0xff
res : 1 0xef
res : 2 0x40
res : 3 0x16
res : 4 0x00
res : 5 0x00
If res1 to res3 are as follows, the MOCO is recognized correctly.
res : 1 0xef
res : 2 0x40
res : 3 0x16
The firmware can be written with the following commands.
cd /media/sd-mmcblk1p2/
mpvspi -m MOCO -e -w <moco id (0-5)> mocotrion.hex
Writing takes about one minute. When writing is complete, the LED on the MOCO turns on.
After writing, test with mpvctrl to check whether the firmware was written correctly.
root@mpv22:/media/sd-mmcblk1p2#  mpvctrl enable moco0 mocol moco2 moco3 moco4 moco5
*** MPV Status ***
Firmware : 2.21
MOCO Status :
 MOCO0 : Enable Ready
 MOCO1 : Enable Ready
 MOCO2 : Enable Ready
 MOCO3 : Enable Ready
 MOCO4 : Enable Ready
 MOCO5 : Enable Ready
  TS   : Disable
Trigger Select : in0
Busy Select :
Level output : 0x0000
NIM Out 0 : gated
NIM Out 1 : clk10k
NIM Out 2 : int25m
NIM Out 3 : eob
root@mpv22:/media/sd-mmcblk1p2# mpvctrl test
test function
*** MPV Status ***
Firmware :
2.21
MOCO Status :
 MOCO0 : Enable Ready TestOK
 MOCO1 : Enable Ready TestOK
 MOCO2 : Enable Ready TestOK
 MOCO3 : Enable Ready TestOK
 MOCO4 : Enable Ready TestOK
 MOCO5 : Enable Ready TestOK
  TS   : Disable
Trigger Select : in0
Busy Select :
Level output : 0x0000
NIM Out 0 : gated
NIM Out 1 : clk10k
NIM Out 2 : int25m
NIM Out 3 : eob

MPOCO [0] Firmware = 2.17
MPOCO [1] Firmware = 2.17
MPOCO [2] Firmware = 2.17
MPOCO [3] Firmware = 2.17
MPOCO [4] Firmware = 2.17
MPOCO [5] Firmware = 2.17
Sometimes firmware cannot be written to the MOCO inserted in the MOCO0 position. In that case, move it to another slot and try writing again.